Quantcast
Channel: Kinder Craze

Easy Pattern Bracelet Toddler Craft

$
0
0

This post contains affiliate links. I earn a small commission each time someone makes a purchase through one of my links, which helps to support the blog.

I can’t believe that it has been two years since I decided to step out of the classroom and stay home to be a full-time mommy to my daughter, Dessa. In those two years, a lot has changed. Our family was blessed last fall with the arrival of our son, Harvey. The struggles of balancing motherhood with work and everything else has continued to be a daily struggle, and life at home has continued to keep me extra busy.

My husband and I had been planning to send Dessa to preschool for the first time this fall, but we ultimately decided to delay preschool for a year and provide her with more intentional learning experiences at home. I don’t have plans to formally homeschool my children now or in the future, but Dessa is young enough that she doesn’t require elaborate lesson plans. We use play-based and simple activities at home as a springboard to promote her learning and development, and she is thriving.

Last week we created simple bracelets with pony beads and pipe cleaner, which served as a perfect opportunity to work on patterns. If you are looking for a simple way to engage your toddler, this activity just might be perfect for your family! (And if you have a baby at home who is always getting into mischief, do what we did and save this project for when the baby is asleep.)

Looking for easy toddler activities? Use pony beads and pipe cleaners to create a simple bracelet. It's a great way to develop fine motor skills and work on pincer grasp. Make the activity even more meaningful by encouraging your child to make patterns. Pattern bracelets are a great mess-free activity for 3 year old and 4 year old children to work on at-home or in a preschool classroom.

This is such a simple task to do with your toddler, but it is highly engaging. I didn’t want to overwhelm Dessa with a rainbow of bead colors and too many choices to distract her from creating patterns, so I let Dessa pick the two colors she wanted to work with first. She chose red and blue beads with a blue pipe cleaner. I got her started on the activity by sliding one bead down the pipe cleaner and folding the end of the pipe cleaner to prevent the rest of the beads from sliding off the back as Dessa worked. (We happened to have star beads that Dessa really wanted to incorporate into her bracelet, but any bead would work.) Next, I got her started by demonstrating how to create a simple ABAB pattern with red and blue beads, then let her do the rest.

Little by little, Dessa worked to continue the pattern and place additional beads onto her bracelet. I’ve attempted some activities during the quarantine that were a total flop and couldn’t hold Dessa’s attention for more than two minutes, but this was not the case with beaded bracelets. She was completely engaged and you could practically feel her level of concentration in the air.

Even though this was designed to be an activity to work on Dessa’s patterning skills, it had the added benefit of being a great fine motor activity. Any activity that activates and challenges those little fingers now will make writing and coloring easier (and less stressful) for Dessa later on when she is ready for school.

Looking for easy toddler activities? Use pony beads and pipe cleaners to create a simple bracelet. It's a great way to develop fine motor skills and work on pincer grasp. Make the activity even more meaningful by encouraging your child to make patterns. Pattern bracelets are a great mess-free activity for 3 year old and 4 year old children to work on at-home or in a preschool classroom.

If I happened to see two blue beads or red beads in a row, I simply pointed out what had happened, and Dessa was quick to remove the extra bead and replace it with the correct color.

After a few minutes, Dessa’s first bracelet was complete! I threaded the loose end of the pipe cleaner through the first fold, then tucked the end under the beads to keep the bracelet secure.

Dessa couldn’t wait to create more bracelets, so we kept the good times rolling! Next up was a purple and green bracelet, then one with orange and yellow beads. I offered support and encouragement along the way for the purple bracelet, then worked on a few household tasks while Dessa beaded the orange bracelet all by herself. Occasionally, I would remind her to do a yellow/orange pattern, but Dessa worked nearly independently and it was a good opportunity for me to see just how well she can execute an ABAB pattern on her own. Not surprisingly, she needs more practice. And that’s perfectly ok. I don’t expect her to become a pattern master in a day.

Looking for easy toddler activities? Use pony beads and pipe cleaners to create a simple bracelet. It's a great way to develop fine motor skills and work on pincer grasp. Make the activity even more meaningful by encouraging your child to make patterns. Pattern bracelets are a great mess-free activity for 3 year old and 4 year old children to work on at-home or in a preschool classroom.

Dessa was extremely cooperative during the activity and made patterns for me, but I knew she was itching to make a bracelet with all the bead colors. I had promised that she could make a rainbow bracelet when she was finished making patterns and Dessa was so happy when she finally had a chance to create that beaded rainbow.

Looking for easy toddler activities? Use pony beads and pipe cleaners to create a simple bracelet. It's a great way to develop fine motor skills and work on pincer grasp. Make the activity even more meaningful by encouraging your child to make patterns. Pattern bracelets are a great mess-free activity for 3 year old and 4 year old children to work on at-home or in a preschool classroom.

Looking for easy toddler activities? Use pony beads and pipe cleaners to create a simple bracelet. It's a great way to develop fine motor skills and work on pincer grasp. Make the activity even more meaningful by encouraging your child to make patterns. Pattern bracelets are a great mess-free activity for 3 year old and 4 year old children to work on at-home or in a preschool classroom.

Beaded pattern bracelets for toddlers.

Once her rainbow bracelet was complete, I bent the end of the pipe cleaner, tucked it through the beads, and handed Dessa her final masterpiece. She proceeded to slip on all four bracelets and show off her brand new arm candy.

Looking for easy toddler activities? Use pony beads and pipe cleaners to create a simple bracelet. It's a great way to develop fine motor skills and work on pincer grasp. Make the activity even more meaningful by encouraging your child to make patterns. Pattern bracelets are a great mess-free activity for 3 year old and 4 year old children to work on at-home or in a preschool classroom. Looking for easy toddler activities? Use pony beads and pipe cleaners to create a simple bracelet. It's a great way to develop fine motor skills and work on pincer grasp. Make the activity even more meaningful by encouraging your child to make patterns. Pattern bracelets are a great mess-free activity for 3 year old and 4 year old children to work on at-home or in a preschool classroom.

If you have a toddler at home and you’re searching for a way to engage your child in a meaningful way, try making beaded bracelets! It was a hit with Dessa and I hope it will be for your child too.

Looking for easy toddler activities? Use pony beads and pipe cleaners to create a simple bracelet. It's a great way to develop fine motor skills and work on pincer grasp. Make the activity even more meaningful by encouraging your child to make patterns. Pattern bracelets are a great mess-free activity for 3 year old and 4 year old children to work on at-home or in a preschool classroom.

Stock Up On Project Supplies

These days I buy almost everything from Amazon and I’m sure you can relate. Here are a few quick shopping links to get you started if you want to create beaded pattern bracelets at home. Just click on any of the images below!

   Making pattern bracelets with pipe cleaner and pony beads is a simple and craft to do with your toddler.

We keep things pretty simple at my house. My husband and I choose to entertain our two young children with simple activities and very few toys. You can often see glimpses into our daily activities in Instagram stories on our lifestyle account @crazytogetherblog or get a more in-depth look on the Crazy Together blog.

The post Easy Pattern Bracelet Toddler Craft appeared first on Kinder Craze.


Easy Preschool Fall Tree Art Project

$
0
0

Fall has arrived in Michigan! The days are getting shorter, temperatures are dropping, and the leaves are changing color. Peak color in our area has recently passed, but I am clinging to every beautiful moment of this season. Right now is the perfect time to be out for a walk because there is still plenty of color on the trees to enjoy, but many leaves have already fallen and they make the most delightfully crunchy sound with every step we take. I’m not the only person in the Gavin house that is embracing fall – my daughter Dessa is entranced by the colorful leaves. She collects them on our daily walks, treads repeatedly through beds of fallen leaves on the sidewalk, and especially loves to “splash” in the leaves as she throws them in the air. I decided to channel all that leafy enthusiasm with a super-fun, quick and easy tissue paper preschool craft. This simple fall art project is virtually mess-free and only uses a few basic art supplies, which is always a win in our house. Ready to get started?

This post contains affiliate links. I earn a small commission each time someone makes a purchase through one of my links, which helps to support the blog. 

Fall is here! This fall tree craft project is super-simple and uses a few basic supplies to make a stunning tree with falling tissue paper leaves. This fall kids craft is a great project for preschool or kindergarten students. Toddlers can do this one too with a little extra help and support. Perfect for at-home or in a classroom setting.

Materials Needed

Before you begin, you will want to collect a few basic supplies to get started. Here is everything you need. (Don’t you just love a good project with a short supply list?)

white cardstock (white paper will work, too)
brown and green Do-A-Dot Markers
glue stick
red, yellow, and orange tissue paper

This just might be the world’s easiest art project to prep for a preschooler. The only work I did in advance was cut the tissue paper into approximately 1″ squares. The actual sizes of each piece varied because I did it in a hurry, but my quick handiwork got the job done. If you want to be extra efficient, you can always purchase a set of pre-cut tissue paper squares on Amazon. (They’re great for making seasonal window decorations – click here to see some of my favorite window crafts.)


Making the Tree

Once I was ready to start crafting with my little one, I used the brown dot marker to draw two curved lines as the tree trunk. That’s the only work I did to help Dessa create this project. Everything else was all her, which is one more reason to love this craft!

Fall is here! This fall tree craft project is super-simple and uses a few basic supplies to make a stunning tree with falling tissue paper leaves. This fall kids craft is a great project for preschool or kindergarten students. Toddlers can do this one too with a little extra help and support. Perfect for at-home or in a classroom setting.

I handed Dessa the dot marker and told her to paint the tree trunk brown. She started by drawing her own lines at the top and bottom of the trunk to enclose the trunk, then began to fill it with brown dots.

Fall is here! This fall tree craft project is super-simple and uses a few basic supplies to make a stunning tree with falling tissue paper leaves. This fall kids craft is a great project for preschool or kindergarten students. Toddlers can do this one too with a little extra help and support. Perfect for at-home or in a classroom setting.

Fall is here! This fall tree craft project is super-simple and uses a few basic supplies to make a stunning tree with falling tissue paper leaves. This fall kids craft is a great project for preschool or kindergarten students. Toddlers can do this one too with a little extra help and support. Perfect for at-home or in a classroom setting.

Dessa loves using dot markers and uses them almost every day in our house. I think the ability to quickly and efficiently fill a space gives her a boost in confidence and I’ll take a dot marker picture any day over a picture scribbled in with traditional markers because the lines are so thick, bold, and bright.

Fall is here! This fall tree craft project is super-simple and uses a few basic supplies to make a stunning tree with falling tissue paper leaves. This fall kids craft is a great project for preschool or kindergarten students. Toddlers can do this one too with a little extra help and support. Perfect for at-home or in a classroom setting.

Once the tree trunk was filled in, it was time to add a little grass to our scene! Dessa used the green dot marker to put some grass at the bottom of the picture. A little bit of green ink got onto our coffee table, but it wiped right off without leaving a stain.

Fall is here! This fall tree craft project is super-simple and uses a few basic supplies to make a stunning tree with falling tissue paper leaves. This fall kids craft is a great project for preschool or kindergarten students. Toddlers can do this one too with a little extra help and support. Perfect for at-home or in a classroom setting.

You’ll also notice a few tissue paper leaves that have already been added to our tree. Dessa got really excited and wanted to add some leaves before she painted the green grass. I’ll fill you in on that step in a minute, but it’s easier to explain the project in a more logical order rather than skip back and forth between steps.

Fall is here! This fall tree craft project is super-simple and uses a few basic supplies to make a stunning tree with falling tissue paper leaves. This fall kids craft is a great project for preschool or kindergarten students. Toddlers can do this one too with a little extra help and support. Perfect for at-home or in a classroom setting. Fall is here! This fall tree craft project is super-simple and uses a few basic supplies to make a stunning tree with falling tissue paper leaves. This fall kids craft is a great project for preschool or kindergarten students. Toddlers can do this one too with a little extra help and support. Perfect for at-home or in a classroom setting.

Fall is here! This fall tree craft project is super-simple and uses a few basic supplies to make a stunning tree with falling tissue paper leaves. This fall kids craft is a great project for preschool or kindergarten students. Toddlers can do this one too with a little extra help and support. Perfect for at-home or in a classroom setting. Fall is here! This fall tree craft project is super-simple and uses a few basic supplies to make a stunning tree with falling tissue paper leaves. This fall kids craft is a great project for preschool or kindergarten students. Toddlers can do this one too with a little extra help and support. Perfect for at-home or in a classroom setting.

After the tree trunk and green grass were painted, it was time to add some fall leaves! Dessa used the glue stick to apply a little bit of glue onto individual pieces of tissue paper, then added them around her tree trunk.

Fall is here! This fall tree craft project is super-simple and uses a few basic supplies to make a stunning tree with falling tissue paper leaves. This fall kids craft is a great project for preschool or kindergarten students. Toddlers can do this one too with a little extra help and support. Perfect for at-home or in a classroom setting.

It didn’t take long before she had created a beautiful fall tree with falling tissue paper leaves.

Fall is here! This fall tree craft project is super-simple and uses a few basic supplies to make a stunning tree with falling tissue paper leaves. This fall kids craft is a great project for preschool or kindergarten students. Toddlers can do this one too with a little extra help and support. Perfect for at-home or in a classroom setting. Fall is here! This fall tree craft project is super-simple and uses a few basic supplies to make a stunning tree with falling tissue paper leaves. This fall kids craft is a great project for preschool or kindergarten students. Toddlers can do this one too with a little extra help and support. Perfect for at-home or in a classroom setting. Fall is here! This fall tree craft project is super-simple and uses a few basic supplies to make a stunning tree with falling tissue paper leaves. This fall kids craft is a great project for preschool or kindergarten students. Toddlers can do this one too with a little extra help and support. Perfect for at-home or in a classroom setting.

This was such a great preschool art project for so many reasons. The simplicity and minimal prep made it a great activity for this busy Mamma, but it also provided a little fine motor practice and an opportunity to work with glue for my three-year-old.

Fall is here! This fall tree craft project is super-simple and uses a few basic supplies to make a stunning tree with falling tissue paper leaves. This fall kids craft is a great project for preschool or kindergarten students. Toddlers can do this one too with a little extra help and support. Perfect for at-home or in a classroom setting.

Even better, this is a Dessa-created piece of artwork that I’m so excited to display in our home.

Fall is here! This fall tree craft project is super-simple and uses a few basic supplies to make a stunning tree with falling tissue paper leaves. This fall kids craft is a great project for preschool or kindergarten students. Toddlers can do this one too with a little extra help and support. Perfect for at-home or in a classroom setting.

The post Easy Preschool Fall Tree Art Project appeared first on Kinder Craze.

Easy and Fun Thanksgiving Turkey Dot Marker Art

$
0
0

Thanksgiving is just a few days away and I think we all can agree that this one feels different from any Thanksgiving that any of us can remember. My husband and I are planning to stay home and prepare an intimate family dinner for ourselves and the kids. The stakes feel high since Thanksgiving is basically the kick-off for the holiday season and I’m determined to make our first-ever Thanksgiving at home extra special for my three-year-old daughter Dessa. She doesn’t exactly know what to expect for the holiday, but Dessa does know that we are taking time to think about all the things we are thankful for, that turkey is on the menu for our Thanksgiving dinner, and that many of our neighbors have silly turkey decorations in their yards. I decided to lean into the turkey theme and create a fun Thanksgiving turkey art project with Dessa’s favorite art supply: Do-A-Dot markers.

This post contains affiliate links. I earn a small commission each time someone makes a purchase through one of my links, which helps to support the blog. 

This painted turkey art project is the perfect Thanksgiving craft for kids. It's simple, washable and makes a great decoration for your family celebration. This craft is simple enough for a toddler, ideal for preschoolers, and the novelty is sure to be enjoyed by older children as well. Grab some dot markers and check out the full tutorial.

I love everything about this project, and here are a few of the reasons you will love this painted turkey Thanksgiving art too:

It’s simple.
It only requires a few basic supplies (that we already had on-hand).
Kids of all ages will probably love it.
The colors are gorgeously vibrant.
It’s easy for children to work on with some independence.
It keeps children engaged for longer than 10 minutes.
The marker ink is washable.
The finished product isn’t covered in scribbles (which is huge in my book).

The fact that this Thanksgiving art project is larger than a standard sheet of paper makes it feel extra big and special. It also conveniently doubles as fun decor that you can hang to display for your family celebration. (You better believe that our little girl’s artwork will hang prominently in our house on Thursday!)

This painted turkey art project is the perfect Thanksgiving craft for kids. It's simple, washable and makes a great decoration for your family celebration. This craft is simple enough for a toddler, ideal for preschoolers, and the novelty is sure to be enjoyed by older children as well. Grab some dot markers and check out the full tutorial.

PROJECT SUPPLIES


Seriously, there is so much to love about this project and I can’t wait to walk you through it. Here are a few quick notes before we dive in:

Age Level: This project was great for my three-year-old and I’m certain that it could easily hold the attention of five- and six-year-olds, too. If you’re working with preschool children, I recommend only drawing small sections at a time for your child to fill in to help keep any feelings of overwhelm at bay. Younger children don’t have the ability to think ahead and keep their hands and sleeves out of wet paint, so if you are doing this with your preschooler, you will probably want to encourage your child to start at the top and rotate the turkey as he or she works to minimize the mess.

For older kids, you can probably draw the entire turkey right away and enjoy the peace and quiet while they independently fill the bird and feathers with dots.

Marker choice: I highly recommend using a black Sharpie to draw the turkey and feathers. The permanent marker didn’t bleed onto my coffee table through the white paper and, more importantly, it didn’t bleed from the wet ink of the dot markers. I originally used a black Crayola marker to make the turkey body and face because I liked the idea of a bold outline for the turkey, but quickly realized that the ink was rubbing into the dot art that Dessa was creating. I used a sharpie on the turkey feathers and was much more pleased with the result. The Sharpie ink didn’t bleed and made a much cleaner outline.

Do-A-Dot markers are washable! If you try this activity with preschoolers, there is a very good chance they will end up wearing some dot marker ink on their clothes. Five minutes into this project, Dessa got brown ink across the chest on her shirt. I foolishly tried to dab the ink away and it just sort of smeared and made a mess. Later on, I sprayed the stain with Dreft and it came cleanly out. Getting dot marker ink on our clothes has become a regular event in our house and it always washes cleanly out.

The setup for this project was quick and incredibly simple (which is always a win in my book!) I cut a large sheet of paper of the big roll of white paper that I always try to keep stocked in the house (it has come in clutch so many times for a big project to help occupy my three-year-old) and used a few pieces of painters tape to hold it in place on our coffee table. Next, I grabbed a black marker and drew a quick outline of a turkey’s body with eyes and a beak. I forgot to add a red wattle next to the beak so you’ll want to make sure you remember this key turkey feature. If you forget, you can always redeem yourself by adding a few red dot stickers as a wattle once the painting is complete. (That’s what we did and it worked out great.)

After that, grab some Do-A-Dot markers and let the fun begin!

Thanksgiving turkey dot art project for kids

I’ve been encouraging Dessa to thoughtfully choose colors for her projects that portray animals and objects the way God made them. Together we decided that orange would be the best color for the turkey’s beak and I suggested that his body should be brown.

Easy Thanksgiving turkey craft for kids Fun and easy Thanksgiving turkey craft for preschoolers

This is a good time to introduce the concept of starting to paint from the top of a picture and to work down from there. If your child starts at the bottom of the turkey, he’s sure to end up with paint all over his sleeve.

This painted turkey art project is the perfect Thanksgiving craft for kids. It's simple, washable and makes a great decoration for your family celebration. This craft is simple enough for a toddler, ideal for preschoolers, and the novelty is sure to be enjoyed by older children as well. Grab some dot markers and check out the full tutorial.

Once the body was painted, it was time to add feathers!

I drew eight feathers onto the bottom of the turkey. Remember that young children can easily feel overwhelmed, so I highly recommend only drawing a few feathers at a time. Dessa selected which colors she wanted to use for each feather and my only guidance was that I encouraged her to make each feather a different color. I often plan colors with Dessa ahead of time, then let her work independently. Marking each feather with a single dot helps her remember the plan we discussed so she can follow through on her own.

This painted turkey art project is the perfect Thanksgiving craft for kids. It's simple, washable and makes a great decoration for your family celebration. This craft is simple enough for a toddler, ideal for preschoolers, and the novelty is sure to be enjoyed by older children as well. Grab some dot markers and check out the full tutorial.

You may have noticed the brown stain on Dessa’s shirt in the photo above. She accidentally got ink on her shirt while we were rolling up sleeves. It looked pretty bad at first and the stain spread when I dabbed it with a wet rag, but the spot disappeared completely after I put the shirt in the laundry. That’s my favorite thing about Do-A-Dot markers – they always wash out of my kids’ clothes!

This painted turkey art project is the perfect Thanksgiving craft for kids. It's simple, washable and makes a great decoration for your family celebration. This craft is simple enough for a toddler, ideal for preschoolers, and the novelty is sure to be enjoyed by older children as well. Grab some dot markers and check out the full tutorial.

Once our feather colors were planned, it was time to paint! You can use dot markers to draw strokes like an actual marker, but I prefer to fill the space with dots. It looks great and requires more concentration and patience from your little artist.

This painted turkey art project is the perfect Thanksgiving craft for kids. It's simple, washable and makes a great decoration for your family celebration. This craft is simple enough for a toddler, ideal for preschoolers, and the novelty is sure to be enjoyed by older children as well. Grab some dot markers and check out the full tutorial. This painted turkey art project is the perfect Thanksgiving craft for kids. It's simple, washable and makes a great decoration for your family celebration. This craft is simple enough for a toddler, ideal for preschoolers, and the novelty is sure to be enjoyed by older children as well. Grab some dot markers and check out the full tutorial.

Once Dessa colored the eight feathers I drew, it was time to take a break. We set the turkey aside and resumed our Thanksgiving art project the following day. At this point, Dessa knew exactly what to do and each feather was relatively quick to complete so I went ahead and drew all of the remaining feathers on her turkey. I also turned the turkey sideways on our coffee table in an attempt to spare her hands and sleeves of any ink transfers.

This painted turkey art project is the perfect Thanksgiving craft for kids. It's simple, washable and makes a great decoration for your family celebration. This craft is simple enough for a toddler, ideal for preschoolers, and the novelty is sure to be enjoyed by older children as well. Grab some dot markers and check out the full tutorial.

We once again designated each feather color with a single dot, then I let Dessa take over the Thanksgiving art project.

This painted turkey art project is the perfect Thanksgiving craft for kids. It's simple, washable and makes a great decoration for your family celebration. This craft is simple enough for a toddler, ideal for preschoolers, and the novelty is sure to be enjoyed by older children as well. Grab some dot markers and check out the full tutorial. This painted turkey art project is the perfect Thanksgiving craft for kids. It's simple, washable and makes a great decoration for your family celebration. This craft is simple enough for a toddler, ideal for preschoolers, and the novelty is sure to be enjoyed by older children as well. Grab some dot markers and check out the full tutorial.

I had washed her shirt overnight and you can see that it was free of brown stains after being laundered.

This painted turkey art project is the perfect Thanksgiving craft for kids. It's simple, washable and makes a great decoration for your family celebration. This craft is simple enough for a toddler, ideal for preschoolers, and the novelty is sure to be enjoyed by older children as well. Grab some dot markers and check out the full tutorial.

Little by little, Dessa worked to paint the rest of the turkey feathers and the bird became more and more vibrant with each dot she stamped. 

This painted turkey art project is the perfect Thanksgiving craft for kids. It's simple, washable and makes a great decoration for your family celebration. This craft is simple enough for a toddler, ideal for preschoolers, and the novelty is sure to be enjoyed by older children as well. Grab some dot markers and check out the full tutorial. This painted turkey art project is the perfect Thanksgiving craft for kids. It's simple, washable and makes a great decoration for your family celebration. This craft is simple enough for a toddler, ideal for preschoolers, and the novelty is sure to be enjoyed by older children as well. Grab some dot markers and check out the full tutorial.

This painted turkey art project is the perfect Thanksgiving craft for kids. It's simple, washable and makes a great decoration for your family celebration. This craft is simple enough for a toddler, ideal for preschoolers, and the novelty is sure to be enjoyed by older children as well. Grab some dot markers and check out the full tutorial. This painted turkey art project is the perfect Thanksgiving craft for kids. It's simple, washable and makes a great decoration for your family celebration. This craft is simple enough for a toddler, ideal for preschoolers, and the novelty is sure to be enjoyed by older children as well. Grab some dot markers and check out the full tutorial.

Once Dessa finished painting, we added a few red dot stickers as the turkey’s wattle and our project was complete!

This painted turkey art project is the perfect Thanksgiving craft for kids. It's simple, washable and makes a great decoration for your family celebration. This craft is simple enough for a toddler, ideal for preschoolers, and the novelty is sure to be enjoyed by older children as well. Grab some dot markers and check out the full tutorial.

Dessa was so incredibly proud of herself for completing this project. She absolutely loves her turkey Thanksgiving art and was beaming when she posed with her painting.

This painted turkey art project is the perfect Thanksgiving craft for kids. It's simple, washable and makes a great decoration for your family celebration. This craft is simple enough for a toddler, ideal for preschoolers, and the novelty is sure to be enjoyed by older children as well. Grab some dot markers and check out the full tutorial.

GET SUPPLIES FOR YOUR TURKEY DOT ART PROJECT

PS –  Just in case your little one wants to get extra silly, you can always add more dot stickers to create an extra-long wattle.

This painted turkey art project is the perfect Thanksgiving craft for kids. It's simple, washable and makes a great decoration for your family celebration. This craft is simple enough for a toddler, ideal for preschoolers, and the novelty is sure to be enjoyed by older children as well. Grab some dot markers and check out the full tutorial.

Happy Thanksgiving to all of you! I know that this year’s celebration will look different from most, but I sincerely hope that it is filled with joy and appreciation for the gifts we have.

You can follow along with more of Dessa’s shenanigans and our household adventures on my lifestyle blog, Crazy Together and discover more Thanksgiving printables and resources here.

The post Easy and Fun Thanksgiving Turkey</br> Dot Marker Art appeared first on Kinder Craze.

Preschool-Friendly Paper Plate Christmas Wreath Craft

$
0
0

Creating crafts at Christmastime will always be one of my favorite ways to celebrate the holidays with children. I loved incorporating crafts and art projects into our holiday fun when I taught kindergarten, and now that my daughter Dessa is old enough for preschool, the crafts keep rolling. We recently created a simple paper plate Christmas wreath that was the perfect age-appropriate project and it even offered a little fine motor practice. Get ready to pin this craft because it’s fast, easy, and uses only a few basic materials you might already have lying around the house!

This post contains affiliate links. I earn a small commission each time someone makes a purchase through one of my links, which helps to support the blog. 

Here's a fun and easy Christmas craft that's preschool-friendly and great for little hands. All you need is a paper plate, some tissue paper squares and a bottle of glue - ribbon is just a bonus if you're feeling "extra"

Paper Plate Christmas Craft Materials

The items needed for this project are so simple and basic. There is a good chance you already have everything you need somewhere in your house.

Paper Plate Christmas Wreath craft supplies: tissue paper, glue, paper plate and foam paintbrush

White paper plate with the center cut out
Bottle of liquid glue
Red and Green tissue paper squares (approximately 1.5″)
Foam paintbrush
Small dish or cup to hold the glue – I like these ones
Red velvet tie-on bows (optional)
Hole Punch (optional)

CLICK TO STOCK UP ON SUPPLIES


Creating the Wreath

Once your materials are assembled, it’s time to dive right in. Pour a little glue into a cup or dish. I like to twist the top just a little bit so the glue comes out slowly if my little one is helping with this step. This helps to regulate how much glue gets poured into the cup and it also helps to build finger strength from all that squeezing.

Here's a fun and easy Christmas craft that's preschool-friendly and great for little hands. All you need is a paper plate, some tissue paper squares and a bottle of glue - ribbon is just a bonus if you're feeling "extra"

Once the glue is ready to go, use the foam paintbrush to spread it onto the paper plate. We did a 6″ section to get started, but there’s no reason why you can’t spread glue all over the entire plate right from the start.

Here's a fun and easy Christmas craft that's preschool-friendly and great for little hands. All you need is a paper plate, some tissue paper squares and a bottle of glue - ribbon is just a bonus if you're feeling "extra"

After the glue has been spread onto the paper plate, it’s time to add the tissue paper. Place one square at a time onto the wet glue. I encouraged Dessa to go slow and to lay the pieces flat as she placed them onto the wreath. The dry squares stick together easily, so this provided a good opportunity to slow down and concentrate on the task at-hand. There isn’t any need to try to arrange the squares a certain way since the random, messy look is a better representation of an actual evergreen wreath.

Here's a fun and easy Christmas craft that's preschool-friendly and great for little hands. All you need is a paper plate, some tissue paper squares and a bottle of glue - ribbon is just a bonus if you're feeling "extra"

Since we had only applied glue to a section of the plate when we started the project, it was time to finish spreading glue around the entire circle. Then we added more tissue paper squares.

Here's a fun and easy Christmas craft that's preschool-friendly and great for little hands. All you need is a paper plate, some tissue paper squares and a bottle of glue - ribbon is just a bonus if you're feeling "extra" Here's a fun and easy Christmas craft that's preschool-friendly and great for little hands. All you need is a paper plate, some tissue paper squares and a bottle of glue - ribbon is just a bonus if you're feeling "extra"

Dessa was so careful and deliberate with every tissue paper square that she glued onto her wreath. She even stopped a few times to turn the wreath over so she could check and see if any of the squares fell off. This was completely her idea and it was one of those things that just sort of left me in awe of the way her brain is developing.

Then it was back to work.

Another status check of her wreath led to an unexpected visit from a silly lion girl.

Dessa added a few more green squares to her wreath, and we were ready for the second part of our project.

Adding Tissue Paper Berries to the Wreath

Once our Christmas paper plate craft was satisfactorily covered with green tissue paper squares, it was time to turn our attention to the pre-cut squares of red tissue paper. Dessa squeezed and squished each red piece of tissue paper into tiny red decorative berries for our wreath (or as Dessa explained, “the kind of berries that birds eat.”)

Her little fingers worked so hard to form tight little berry balls for her wreath and the activity provided a great opportunity to develop those fine motor skills.

Here's a fun and easy Christmas craft that's preschool-friendly and great for little hands. All you need is a paper plate, some tissue paper squares and a bottle of glue - ribbon is just a bonus if you're feeling "extra"

Once the tissue paper berries were complete, Dessa placed one small drop of glue at a time around the wreath and gently placed her “berries” onto the glue.

Here's a fun and easy Christmas craft that's preschool-friendly and great for little hands. All you need is a paper plate, some tissue paper squares and a bottle of glue - ribbon is just a bonus if you're feeling "extra" Here's a fun and easy Christmas craft that's preschool-friendly and great for little hands. All you need is a paper plate, some tissue paper squares and a bottle of glue - ribbon is just a bonus if you're feeling "extra"

I was amazed at how well-spaced all of her berries were. I was certain that Dessa’s finished wreath would be 90% bare with a clump of berries gathered in one small area. She surprised me with this detail.

Honestly, this would be a great stopping point for the Christmas craft – especially if it were spur of the moment and these were the only supplies you had on-hand. But I really wanted to add a velvet bow as a finishing touch to Dessa’s tissue paper Christmas wreath, so we waited for the glue to dry. Dessa embraced the opportunity to pose like a lion one more time.


Attaching the Bow

Once all the glue had dried, I grabbed my hole punch and a small velvet tie-on bow. I bought a pack of bows from my local Target store, but you can order similar bows on Amazon. (This set with the little bells is especially cute.)

Punch two holes next to each other at the top of your wreath and use the bow’s twist-ties to secure it into place.

Here's a fun and easy Christmas craft that's preschool-friendly and great for little hands. All you need is a paper plate, some tissue paper squares and a bottle of glue - ribbon is just a bonus if you're feeling "extra" Here's a fun and easy Christmas craft that's preschool-friendly and great for little hands. All you need is a paper plate, some tissue paper squares and a bottle of glue - ribbon is just a bonus if you're feeling "extra"

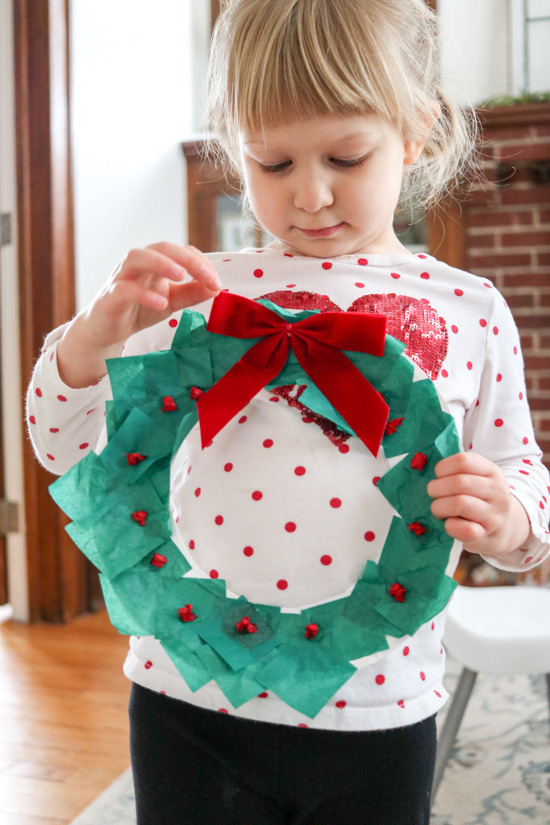
The finished result is a perfectly adorable tissue paper Christmas wreath! I love this sweet little craft and was so pleased with how it turned out.

Here's a fun and easy Christmas craft that's preschool-friendly and great for little hands. All you need is a paper plate, some tissue paper squares and a bottle of glue - ribbon is just a bonus if you're feeling "extra"

Dessa couldn’t wait to find the perfect location to hang her finished Christmas wreath and I loved seeing the look of pride on her face.

Here's a fun and easy Christmas craft that's preschool-friendly and great for little hands. All you need is a paper plate, some tissue paper squares and a bottle of glue - ribbon is just a bonus if you're feeling "extra"

This paper plate Christmas wreath was the perfect fast craft to complete with my three year old. I loved how easy it was to prep and the fact that the tissue paper and glue kept the mess to a minimum. If you’re looking for a simple craft to create at home or in the classroom with little ones in the last days leading up to Christmas, I highly recommend this project.

Wishing you all a safe, healthy, and merry Christmas from my family to yours! Stop by my lifestyle blog, Crazy Together for more glimpses into our life at home with two little ones – along with some fashion, decor, and financial goals mixed in.

Here's a fun and easy Christmas craft that's preschool-friendly and great for little hands. All you need is a paper plate, some tissue paper squares and a bottle of glue - ribbon is just a bonus if you're feeling "extra"

Click any image below to stock up on project supplies from Amazon.


The post Preschool-Friendly Paper Plate</br> Christmas Wreath Craft appeared first on Kinder Craze.

Dot Marker Rainbow Name Tracing

$
0
0

As a busy mom of two young children, I know the value of simple activities that are quick to set up and keep children engaged. Even better is when an activity helps reinforce an academic skill like letter recognition. My daughter Dessa is now three years old and technically “preschool” age (even though she’s still at home with me full time), but dot markers will always be one of our tried-and-true art supplies for sparking her creativity and imagination, even for a task that’s as simple as tracing her name with marker dots. I actually took these photos of Dessa using dot markers to trace the letters of her name last spring and just recently rediscovered them on my computer. Fortunately, the activity is timeless and it’s never too late to share an engaging activity for young learners.

This post contains affiliate links. I earn a small commission each time someone makes a purchase through one of my links, which helps to support the blog. 

graphic that reads "dot marker rainbow names for preschoolers" with photo of child using bingo dotters to trace name

Materials Needed

The setup for this dot marker name tracing is truly as simple as it looks and only takes about 60 seconds. I grabbed a set of Crayola markers, our all-time favorite Do-A-Dot Markers (I store mine in a container like this for easy organization on our craft shelf), and a sheet of paper. A standard sheet of 8.5×11″ paper would work in a pinch for short names, but if your child’s name has a lot of letters, I recommend having some legal-size paper on hand, which is what I used with Dessa on this day. (Making a banner of extra big letters with a white paper roll would be a fun twist on this project too!)


Name Tracing Activity Set-Up

Grab your traditional markers and write your child’s name in large letters across the paper, using a different color for each letter. Then give your child the coordinating colors of dot markers so that he/she can match the colors and trace the letters with dots.

There are so many great skills to love about this simple activity. Of course, it helps to develop letter and name recognition, but I love doing dot marker names because it offers an experience to learn more about letters without putting pressure or making it “feel” like a learning activity. This is also a great way to help your child begin to build concentration.

Don’t you love when a simple little activity packs such a great big punch for little learners?

Dessa has a lot of determination to cover every single inch of the letters I write. Don’t worry if your toddler doesn’t have the same degree of enthusiasm for completely covering the letters. It’s a valuable learning experience, no matter how the finished name turns out.

Dessa cracks me up with her great big imagination. It’s impossible for her to use dot markers without pretending that the markers are “friends” and carrying on imaginary conversations with them. This 10-minute activity took about 30 minutes for her to complete because she stopped to play in the middle, which was fine by me. An active imagination is a healthy thing and her detour gave me more time to sit back and relax before we moved on with our day.

toddler playing with do-a-dot markers while tracing name

Once she finished playing with the “friends”, it was back to work, until at last her name was complete.

child using green, blue, orange, red and purple dot markers to trace letters in name

I’m telling you, this simple activity is a perfect way to keep your toddler or preschooler busy and is a colorful, fun way to work on name recognition. Give it a try and let me know how it goes!

The post Dot Marker Rainbow Name Tracing appeared first on Kinder Craze.

Easy 4th of July Hat Craft for Kids

$
0
0

How is it possible that the 4th of July is just around the corner? If you’re scrambling like me to add a quick and easy kid’s craft to your family celebration with minimal prep and materials that you probably already have in the house, you’re in luck! This simple patriotic hat serves as a great activity and makes for a fun and festive accessory for the 4th of July.

family wearing red white and blue construction paper kid craft hats for 4th of July

This patriotic hat craft was always a favorite activity in my kindergarten classroom. My students made colorful red, white, and blue hats as a fun Constitution Day activity in mid-September. I loved the project for that time of year because it was unbelievably simple and didn’t require a high level of skill from my kindergarten students that were still developing those fine motor skills. Little did I know that this would also serve as a perfect at-home activity for my preschooler and toddler.

Materials Needed

  • 4×24″ of red construction paper headbands* (1 per child)
  • 4×1.5″ strips of white construction paper (6-8 per child)
  • 9×12″ sheets of blue construction paper
  • Stapler
  • Paper cutter (optional, but it makes the prep so much easier!)
  • Glue sticks and scissors (these blunt end scissors are perfect for children who know how to cut independently and these plastic scissors were clutch for my toddler who wanted to be just like his big sister.)

*One quick note about the headbands: 

I always had 12×18″ sheets of construction paper on-hand in my classroom and I still love having the extra large paper size on-hand in my home, especially Tru-Ray construction paper because it’s extra durable and the colors are so vibrant. For this project, I stapled a 18×4″ and a 6×4″ paper strip together to create a band long enough to wrap around a child’s head. If you only have 9×12″ sheets of paper on-hand, it’s totally ok and you can still do this craft. You can just staple two 4×12″ pieces of red paper together to create the headband. 

Project Preparation

Preparing for this project is super simple and will literally require 5 minutes (or less) of your time. Even though it’s quick work, I highly recommend doing these few steps ahead of time without your kids underfoot because everything is more stressful and time-consuming if you’re trying to scramble to get ready for a craft project with little ones around.

All you need to do to get started is create a 4×24″ strip of red paper by stapling two smaller strips together, cut several 1.5×4″ strips of white paper that will serve as stripes, and print a sheet of stars for each child onto blue construction paper. (Most at-home printers can handle construction paper without any issues – just make sure you trim the sheet to standard 8.5×11″ size before you load it in the printer.)

supplies to make 4th of July hat craft for kids and toddlers

You can download a template and a set of printable instructions for a Patriotic Headband for FREE! Enter your email below to have the craft sent right to your inbox!

Creating the Patriotic Hat

Once the papers are prepped, you are ready to go! My daughter Dessa is a few weeks shy of her 4th birthday and she’s been working with scissors for over a year. She has cut complicated shapes from paper in the past, but I wasn’t sure what to expect when she worked on cutting out her stars. I encouraged her (as I always do) to begin by separating all of the star pieces, then to cut each star individually. I was mentally prepared for her stars to be unrecognizable, but she did an amazing job.

Please don’t stress if your child’s cutting skills have a long way to go. Give him or her an experience with cutting the stars if they’re ready, or you can cut the stars for your child as I did for Harvey. He had a lot of fun just holding his pre-cut stars and plastic scissors. I gave him a few scraps to play with, which he held next to his scissors and proudly exclaimed “cutting!” Even if you do all of the work, simply providing your child with an experience while they interact with the supplies is good and meaningful activity for him or her.

kids cutting out stars to create 4th of July craft

Once the stars were prepped, it was time to work on the hat! Use the glue stick to glue the white paper strips onto the red headband. I spoke with Dessa about giving her strips “good space” and not squeezing them together and she did a beautiful job.

gluing white construction paper strips for patriotic kids paper craft

gluing red white and glue 4th of July hat craft for kids

After a minute or two, the stripes were all glued into place and it was time to add blue stars to our patriotic hats. I once again reminded Dessa to “give her stars good space” and she quickly went to work.

Harvey, meanwhile, insisted on having a glue stick of his own to work with. This certainly wasn’t an activity that he could handle independently, so I guided his hand as he placed glue on the back of blue stars and white paper strips. He felt so proud to be using glue like his big sister.

gluing blue stars onto red and white patriotic kids hat craft for 4th of Julyglueing blue construction paper stars onto 4th of July patriotic kids hat craft

Once the stars were glued, the kids’ work was complete! I wrapped a paper band around each child’s head, held the two ends together while I slipped it off their heads, and stapled the hat closed. My kids were so excited about their new 4th of July hats, it was hard to get them to sit still for a photo!

red white and blue patriotic hat craft for kids

Eventually, the excitement calmed down enough for us to head outside, set up the tripod, and snap a quick group photo. This was such a fun project and I’m sure your kids will love it too!

family celebrating 4th of July by wearing patriotic red white and blue hat kid crafts

The post Easy 4th of July Hat Craft for Kids appeared first on Kinder Craze.

Announcing the Fresh New Look of Kinder Craze

$
0
0

You may notice that things look a bit different around here and I am beyond thrilled to finally share the fresh new site design with you today! This update has been a labor of love that I have spent the past nine months planning and preparing to launch. Everything has been overhauled- from the Kinder […]

The post Announcing the Fresh New Look of Kinder Craze appeared first on Kinder Craze.

17 St. Patrick’s Day Picture Books for Kids

$
0
0

St. Patrick’s Day is a holiday that celebrates the rich culture and traditions of Ireland. One of the best ways to introduce children to this festive occasion is through books. Picture books can provide a fun and interactive way for kids to learn about leprechauns, Irish folklore, and the history of St. Patrick’s Day. In […]

The post 17 St. Patrick’s Day Picture Books for Kids appeared first on Kinder Craze.


15 Spring Picture Books Your Students Will Love

$
0
0

Spring is in the air! It is filled with new growth, fresh colors, baby animals and a renewed sense of life.  It’s one of my favorite seasons! Add some spring to your lesson plans with these spring picture books. Your students will love learning more about spring through these books. 1. Goodbye Winter, Hello Spring […]

The post 15 Spring Picture Books Your Students Will Love appeared first on Kinder Craze.


Latest Images